
One of the nice things about running a venture like this is that you never know who is going to drop you an e-mail or give you a phone call and introduce themselves, often accompanied with a fascinating background as to why they have taken the trouble to do so.
This month was no exception when a retired engineer by the name of Greville Dawson phoned me up for some background information towards a Probus Club talk he was planning to give and wanted to ask me about the Lloyd’s unlimited rating. This is a British rating applied by the Lloyd’s register for hydroplanes within the U.K. attempting to be the fastest boat in the world. It is usually denoted on the hull of the craft by a roundel of white with a black border showing the infinity symbol above and below that the letter ‘K’ for United Kingdom, followed by the register number. Hence for example Donald Campbell’s famous Bluebird jet hydroplane was denoted Bluebird K7 and the Lloyds Unlimited rating roundel on the side of the craft is similar to the following:
Greville’s interesting background to the question was that in the 1960’s he had written a dissertation on the Land Speed Record that had grown to such a length that in effect it was more of a manuscript and he sent a copy of it to Ken Norris, the designer of Donald Campbell’s Bluebird’s for review. Apparently Ken was so impressed with the manuscript that he invited Greville to his works premises for a chat to discuss it. This was shortly after Donald’s fatal accident and outside the Norris premises was a mock up of a rocket powered car designed to break the sound barrier that Ken and Donald had been working upon.
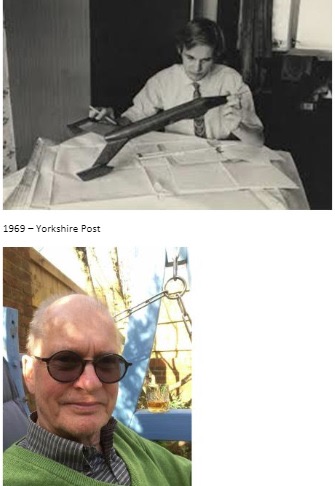
Greville working on the wind tunnel model of the car in 1969 and as he is today
As a result of that meeting Greville and Ken struck up a friendship which blossomed into Greville assisting Ken on the theoretical development of this land speed record car including wind tunnel testing of models and trying to obtain two rocket motors from Rolls Royce to power the vehicle. Unfortunately the company declined to provide such rocket engines for the venture and as a result the project was shelved but it was fascinating to hear Greville recalling the times spent with Ken Norris and those who had known Donald Campbell so well.
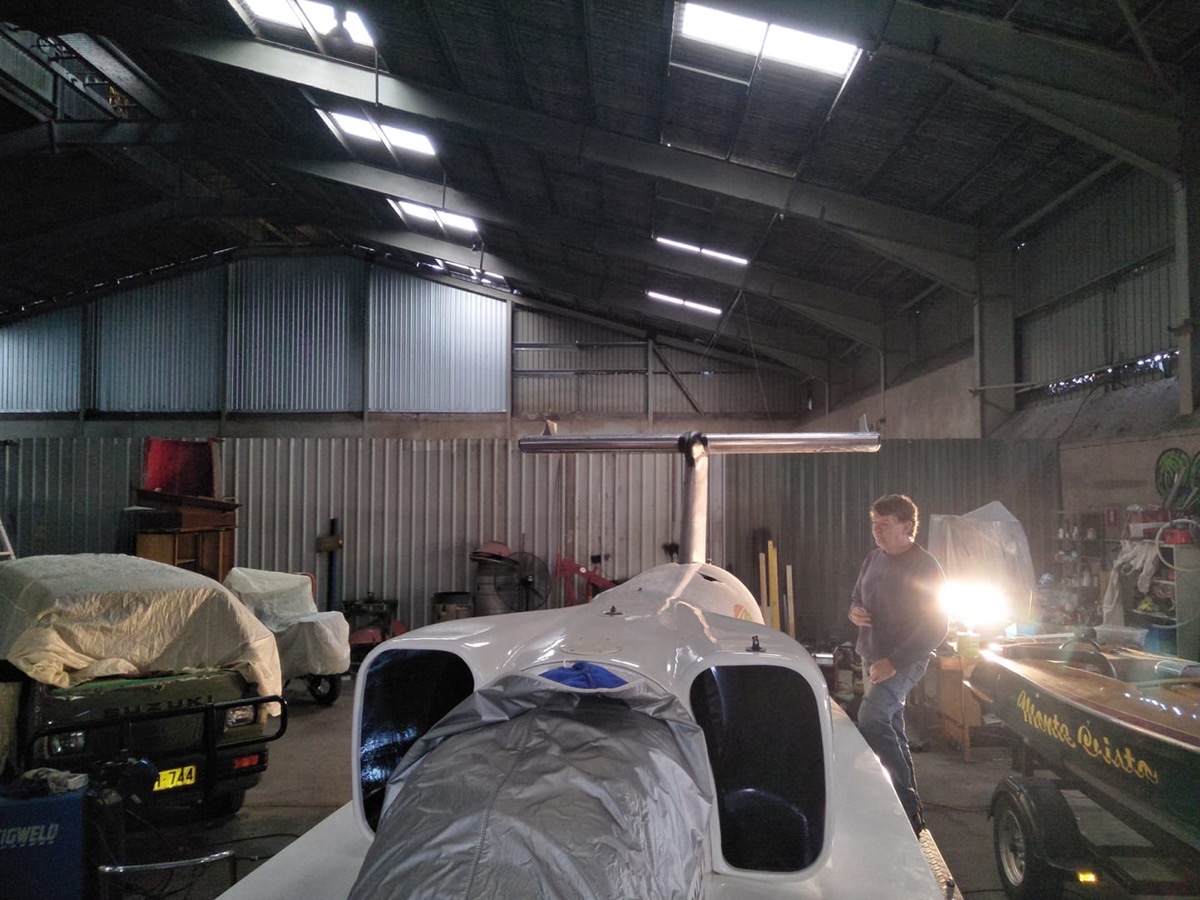
Bringing things up to date our good friend Dave Warby in Australia, having last month brought his jet hydroplane Spirit of Australia II back from the contractors who had required it in order to fabricate a T tail for the craft, has this month been able to do the final fitting of that new framework into the hull. This alteration to the jet hydroplane has also required Dave and his team to make new engine covers for the aft end of the craft but you can readily see how much different she now looks with this addition.
As Dave and his team make preparations for the craft to undertake its next round of tests at Blowering Dam, his partner Lesa has undergone a double knee joint replacement and her recovery from that major surgery has been nothing short of amazing. She is now chasing Dave on their daily circuit of several kilometres and when she catches him there will be hell to pay. Seriously, we wish her all the very best with her brilliant recuperation and for showing everyone what can be achieved if you set your mind to it.
Back with Longbow and we started off this month with trying to resolve the smallest of problems and ended up at the back end of July with starting to address one of the largest issues with the build.
To begin with the small issues there are machined bolts that fit into the two fuel control arms on the Rolls Royce Viper jet engines we are using to power the craft and these bolts pass through one side of the arm and then screw into the corresponding other side. These bolts do not come with crated exchange engines, they are part of the aircraft control linkages and whilst we could have just drilled the threaded side of the fuel control arms and put a metric bolt all the way through, it would to some degree weaken the fuel control arms. Tracking down the right bolts that are specifically meant for this on an aircraft that is no longer in current production was not easy but eventually we had success.

Next on the agenda of small details was to find the correct screws to mount the aircraft gauges relating to engine performance that we needed in a control box that I was building for statically testing the jet engines. Again given the aircraft is no longer in production this was going to be something of a treasure hunt and whilst some might say just drill the old threads out in the gauge captive nuts and put a metric screw and nut all the way through, I felt it was worth taking a little time and effort to do it right. Some of the gauges had screws which were type 4BA that we were informed about by our good friend and gas turbine expert Ian Bennett. Ian has forgotten more about gas turbines than I will ever know and has two great websites, one on gas turbines and the other on his Outside Broadcast RF and engineering services:
http://www.gasturbineworld.co.uk/
However whilst some threads to the gauges were 4BA, others whilst having threads close to this were not a match and a 4BA would jam as you started to screw it in. Investigations revealed that gauges of this period were not only made with mounting threads of 4BA, they were also made with and roughly the same diameter threads of 6-40UNF, 1/8th Whitworth, British Cycle thread, metric and 6-32UNC. We even had two gauges that outwardly looked the same and were built by the same manufacturer but one gauge used 4BA thread and the other clearly did not.
As I could not get a thread gauge down such a small hole and it was also too small a hole to put a casting plug into, I could either buy all the various screw options and try them for thread or use a little trick I was told about which was to twist a bamboo BBQ skewer part way down the threads on the gauges and withdrawing it count the thread impression from the gauge on the skewer over an inch length and caliper the diameter of that impression, from that you can work out what screw you need.
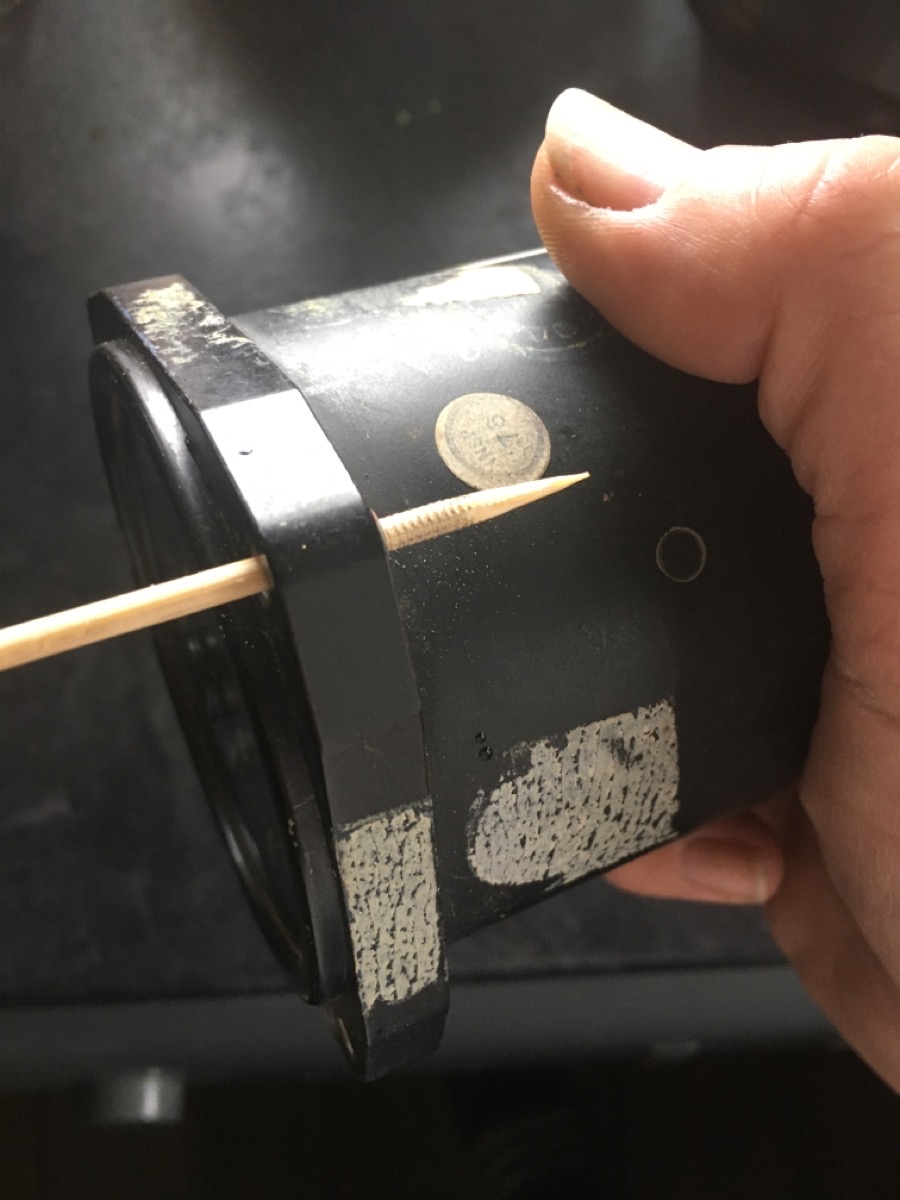
The result was we have gauges in our case that are 4BA and also some which are
6-32UNC threads and these were so very kindly supplied by our sponsor Avon Stainless Fasteners along with mounting bolts for the throttle quadrant.
Making the control box for static engine tests I thought rather than using our best marine plywood from Robbins that is for the hull of Longbow, I would pop down to our local timber merchants with a cutting list and use their best stock. Normally you can walk around the timber yard and pick out what you want but with the pandemic I had to hand over my cutting list to a person behind a screen, pay up front by card and await the chap returning to my car with the cut lengths. A little while later a pile of cut plywood was left on the pavement next to the car which was some of the worst quality I have seen in a long while. Whilst perhaps in hindsight I should have complained, in typical British fashion I took it on the chin not to make the same mistake again and set off back home to make the best of what I had received.
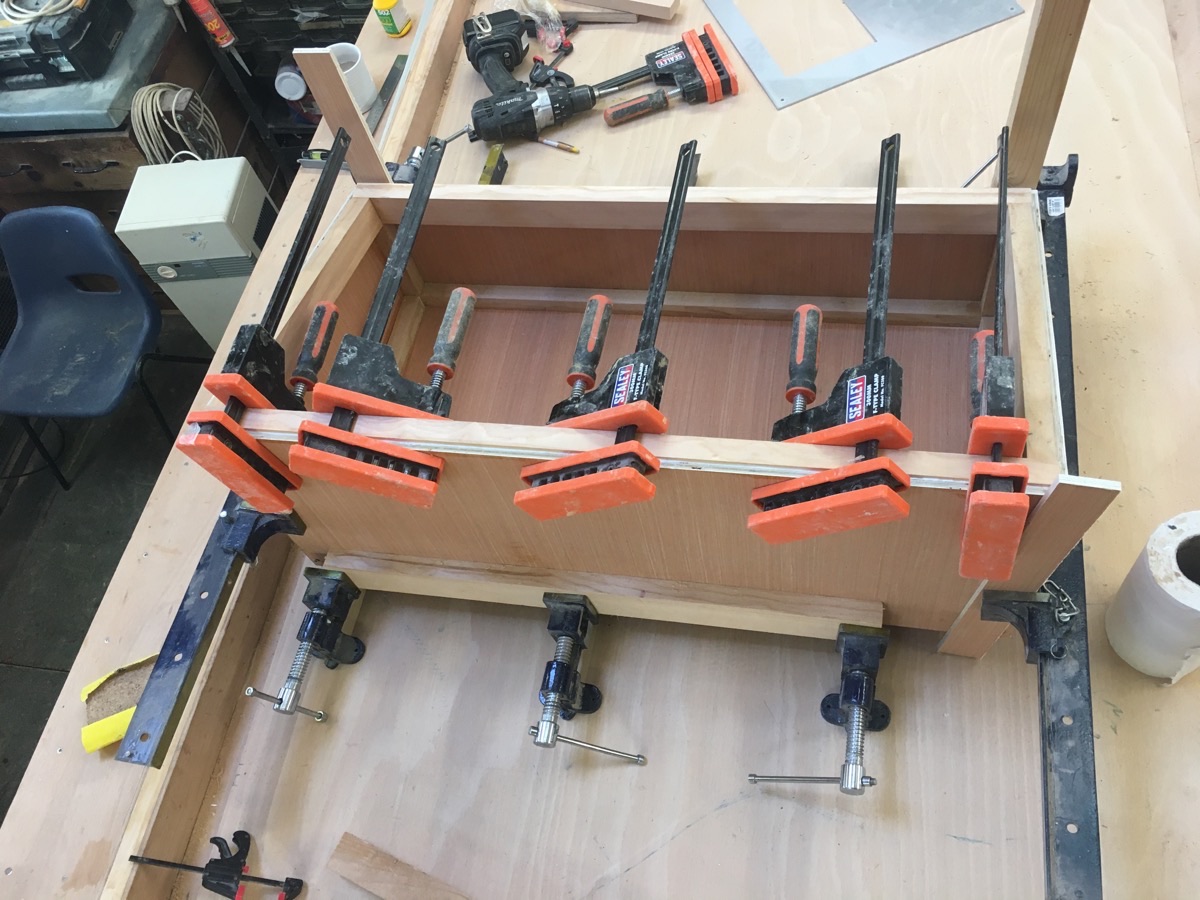
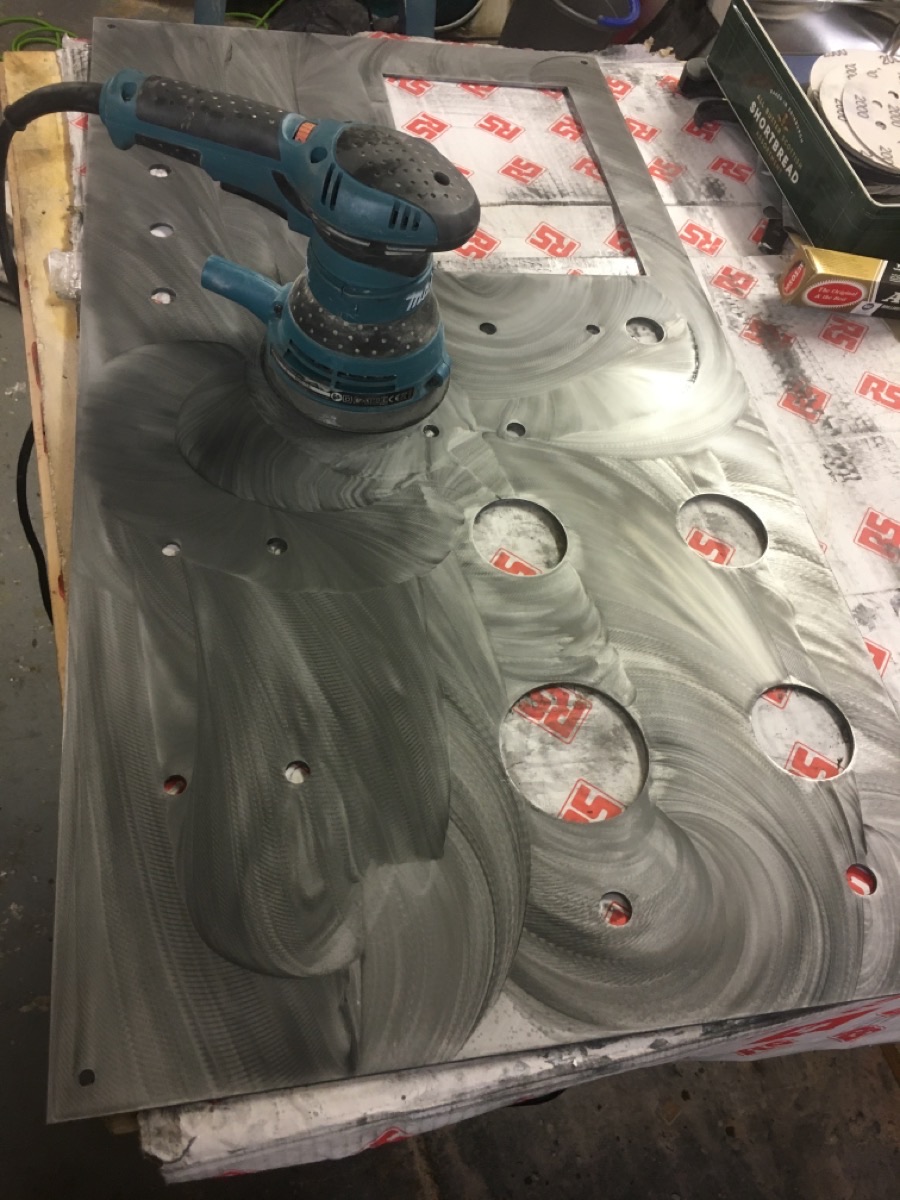
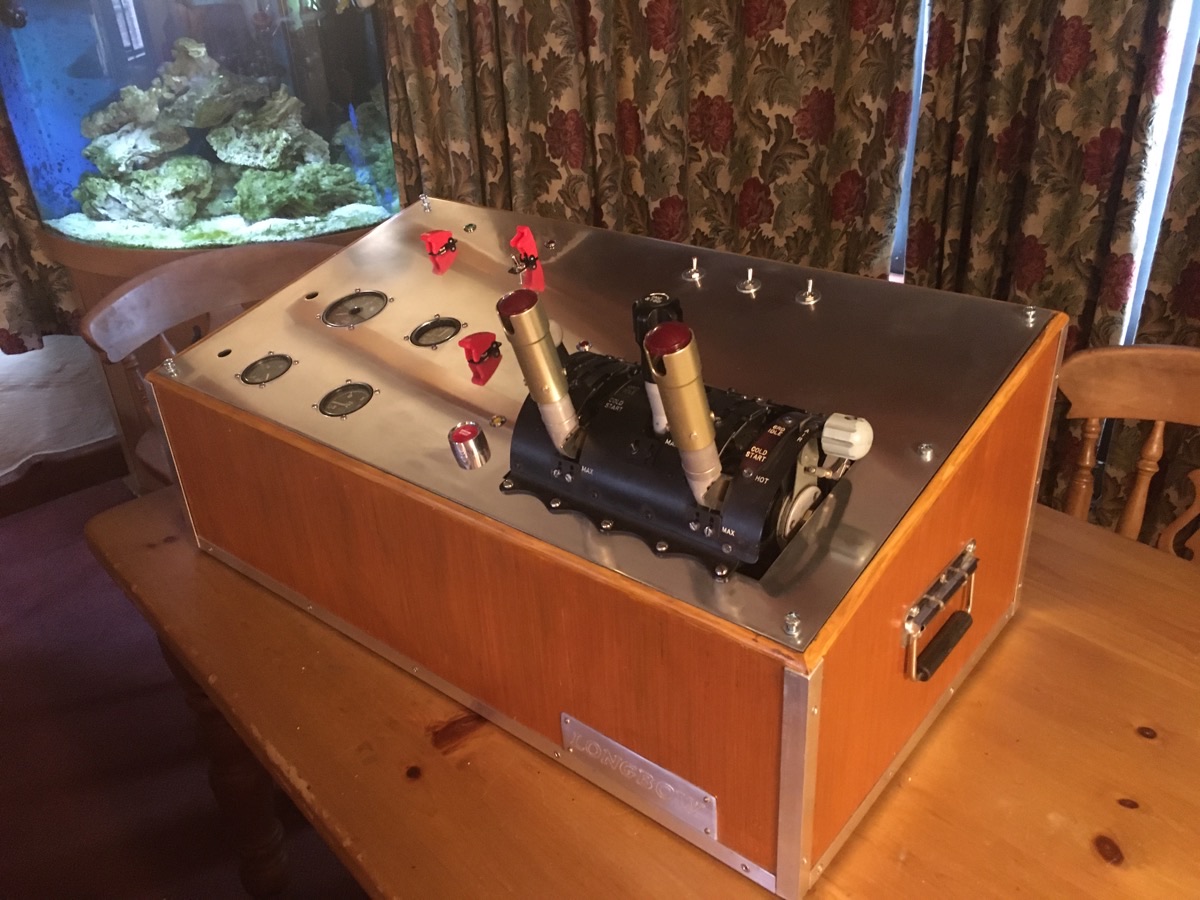
Having then made the timber control box I came to fit the brushed aluminium panel that last month we had laser cut to receive the gauges and switches etc and found that it had a scratch to it’s upper surface that would annoy me every time I looked at it. I know many folk regarding this will have their own way of resolving it but what I tend to do is use an orbital sander with a series of grits from 250, 400, 600 to get most of the scratch out and then in 1000 steps all the way through to 10,000 with the finer grades done with slightly soapy water as a lubricant. When I can just about begin to see my ugly face as a reflection, I then polish with several different grade mop heads on the orbital sander combined with Mothers Mag and Aluminium polish or equivalent and it usually comes up reasonably well.
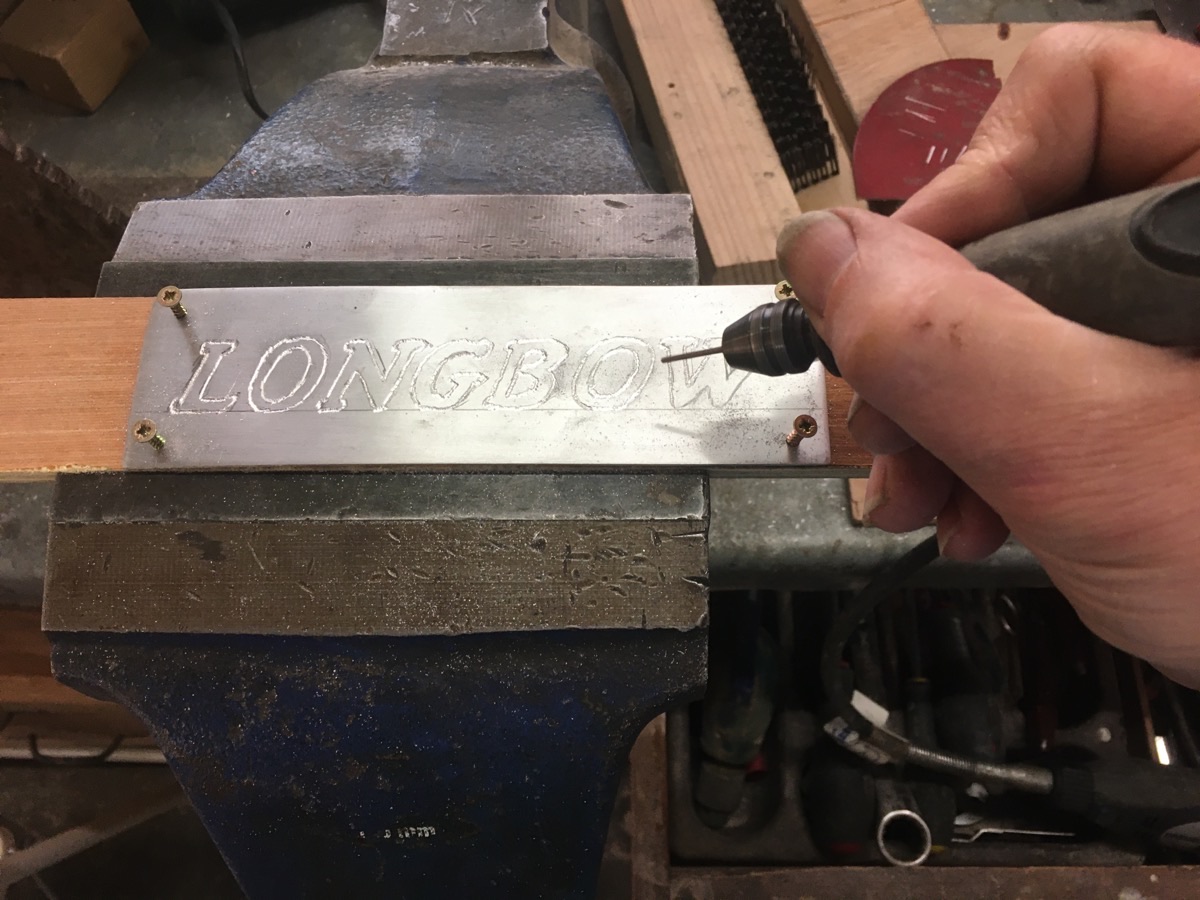
With the scratch removed I could then fit the aircraft gauges for exhaust gas temperature, rpm, oil pressure and oil temperature of the jet engine, the RS Components supplied various switches, associated lights and switched circuit breakers, along with engine start button and the Lynx helicopter throttle quadrant. To finish off the look of the control box I also scribed an aluminium Longbow nameplate to mount on the front of the box and fixed some aluminium trim with carry handles.
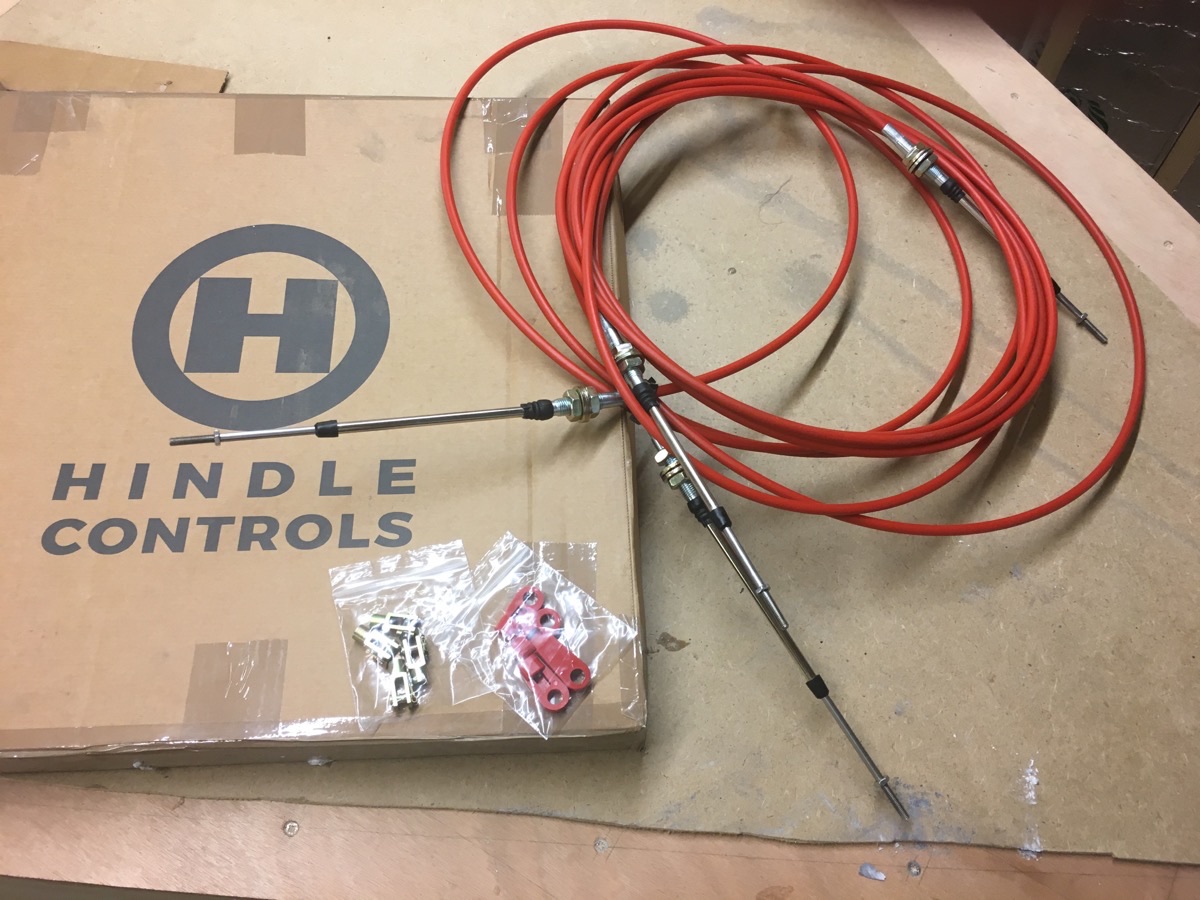
For the mechanical control cables from the Lynx throttle quadrant to the jet engine under test, we contacted Sam Wiles the General Manager of Hindle Controls Ltd who very kindly came on board with the project to make us up an appropriate set of their cables.
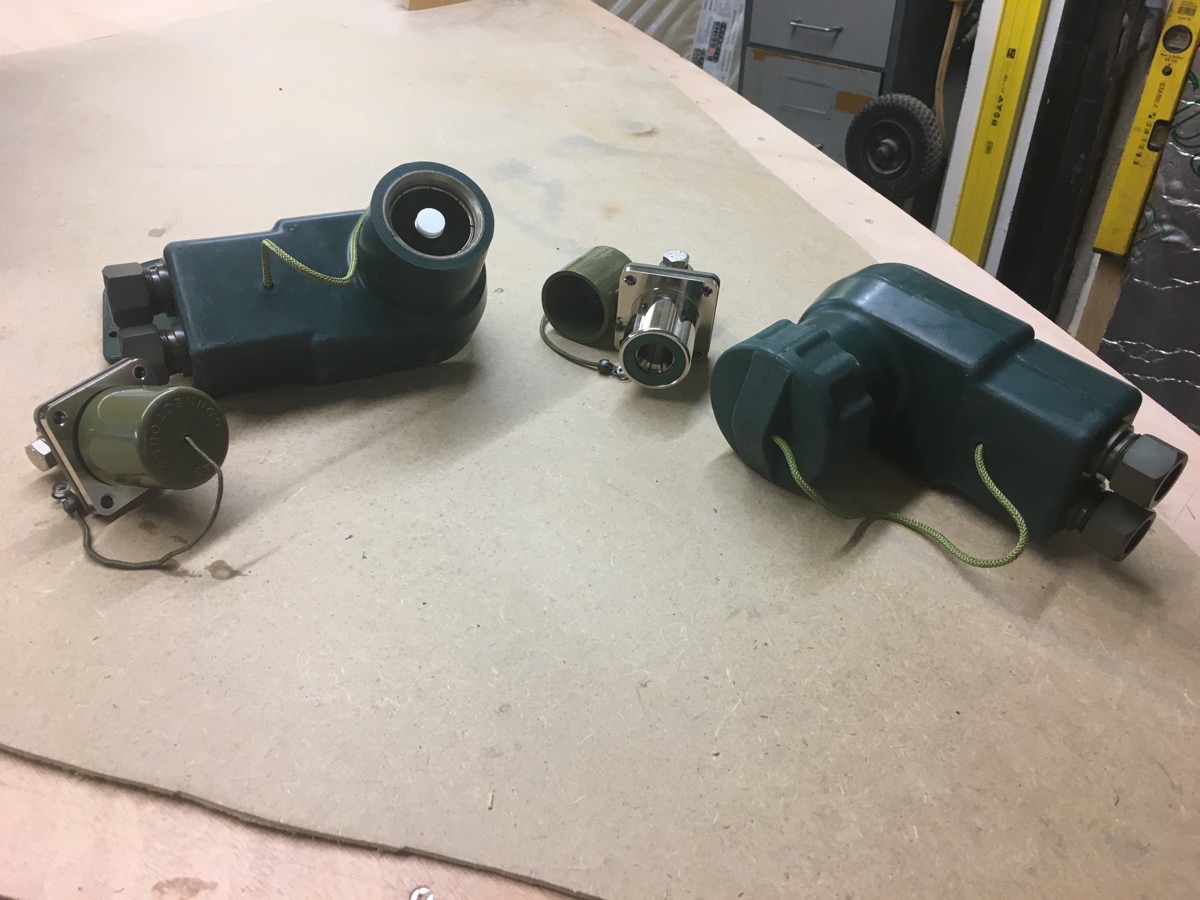
When it comes to starting the jet engines within Longbow and as mentioned last month, we need to connect the start batteries / soft start system in the tender boat alongside the jet hydroplane to one of the jet engines, start that engine, then disconnect that electrical supply and connect it to the next jet engine to start that one, then disconnect again before Longbow can set off down the course making her run and shut down at the other end of the lake where another tender boat with start batteries etc will repeat the procedure for the return leg back to base. With such an arrangement out on the water, attaching the electrical supply to the side of Longbow needs to be safe, simple, secure and quick to connect then disconnect.
With that design requirement in mind I stumbled across TT Electronics who as part of their wide range of business activities, manufacture highly ruggedized connectors for military vehicles of the U.K., USA and NATO countries. When you are on the battlefield and for whatever reason you have to jump start your personnel carrier whilst under fire, you need a connector that is quick to fit and disconnect, safe and that will handle lots of power, which is exactly what we were looking for.

Colin Green and his colleagues at TT Electronics could not have been more helpful in coming on board with the venture and vey kindly sent us two male and two female military electrical power quick connectors. I have to say what a superb piece of engineering these are and they are going to be perfect for the unique task we require them for.
This month with regards to putting things in place for the trailer that will need to be fabricated for Longbow for when we turn her over to complete the rest of the build we have had Andrew Jackson of Peak Dynamics and Mark Sugden of John W Laycock Ltd come on board with a commitment for Andrew’s company to supply the trailer suspension / running gear and Mark’s company to supply the trailer steelwork. These two companies who have an excellent longstanding working relationship with each other have come to our assistance with a considerable commitment of both product and material in these difficult times and we cannot thank them enough for helping us out with making the venture happen.
Back with the main hull of Longbow my wife Gill and I managed to steam bend the corresponding large section sponson runner into place to match the opposing one that we did last month.
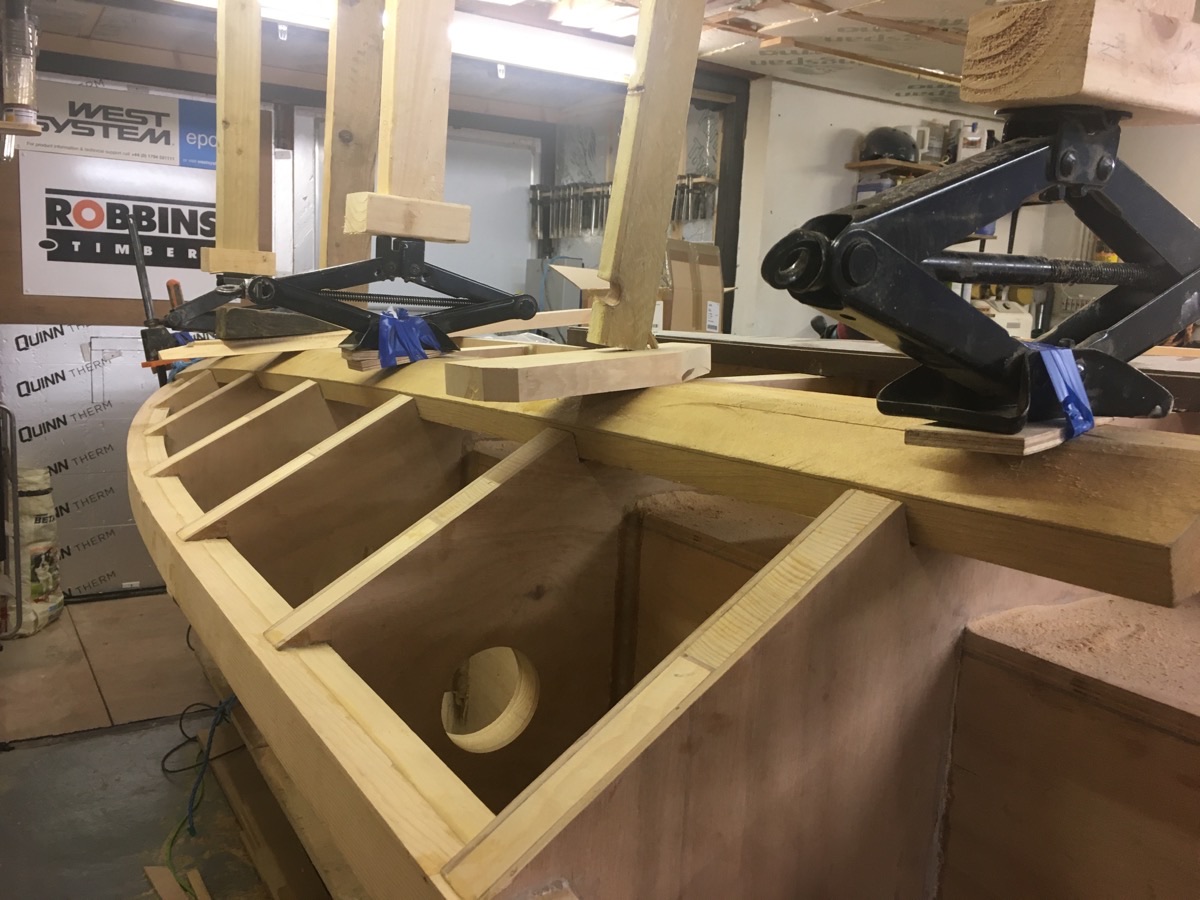
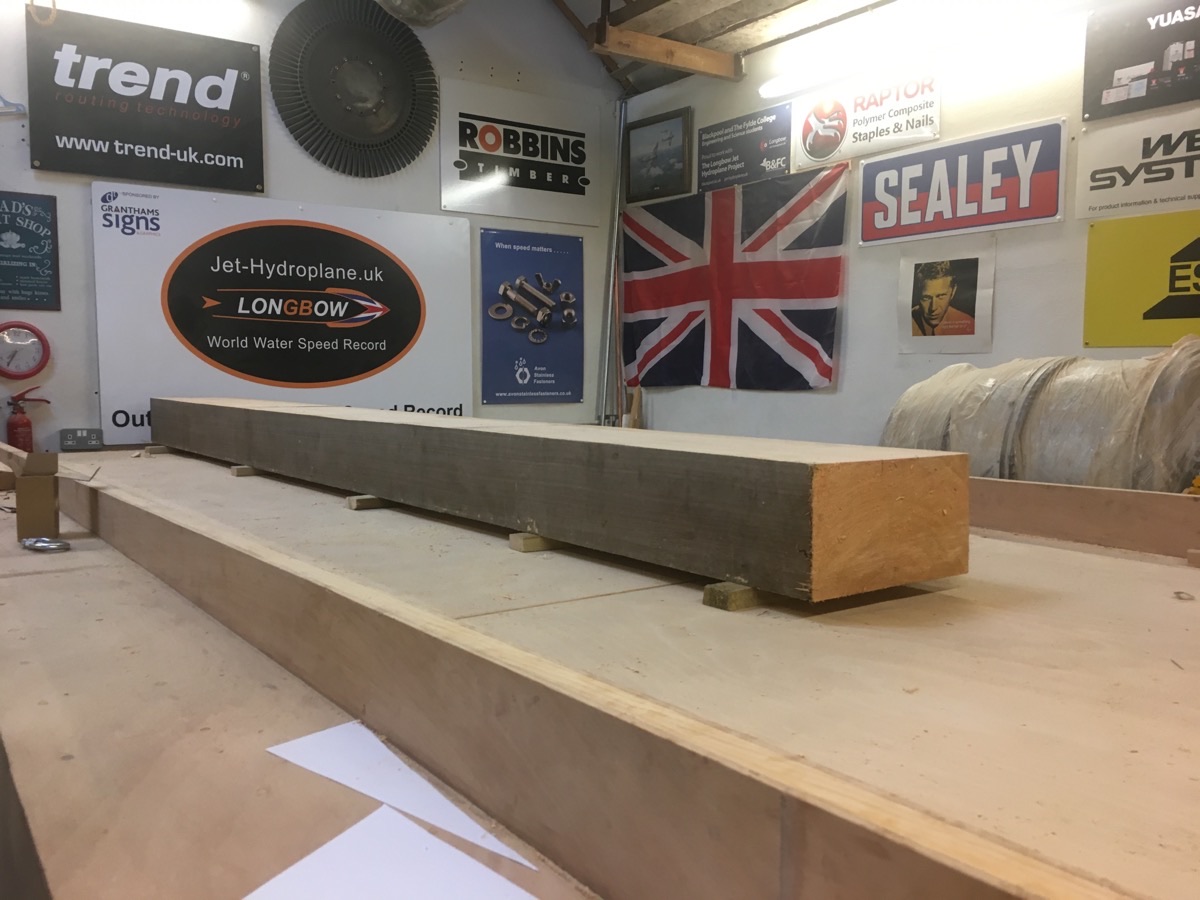
However then I did the wonderful thing of cracking a rib and anyone who has suffered that will know all you can do is rest it so that curtailed further work on the hull for this month whilst it thankfully recovered. With some enforced downtime for recuperation I started to enquire about sourcing wood for the rear planing shoe of Longbow and Robbins who had supplied all of our timber to date unfortunately had no such dimensionally large section Douglas Fir (Oregon) that we were seeking for this item.
What followed was no end of phone calls and emails throughout the country and whilst I could source the section of Douglas Fir we needed in freshly felled British grown timber, a section of that size would take years for it to naturally season and dry down to a point where it could be used on the hull and British grown Douglas Fir tends to have undesirable widely spaced growth rings. To forcibly dry it down using a kiln the companies we approached were geared up to dry much smaller sections and they would not halt their busy production schedules to put one very large section through their kilns on what would be a prolonged heating cycle for the section of wood required.
After a lot of searching I stumbled across Roger Arveschoug of Capricorn Eco Timber and Tiga Wood who had a section of imported slowly grown Canadian Douglas Fir of the right dimensions that had been naturally seasoned over the years since it was first cut. Roger who is qualified to grade aircraft timber has so very generously come on board with the venture to supply us with this large beam which arrived with us last week. It may be a while with a pen knife to get it down to the shape that we require so I will keep you posted in future updates about how we get on with that one.
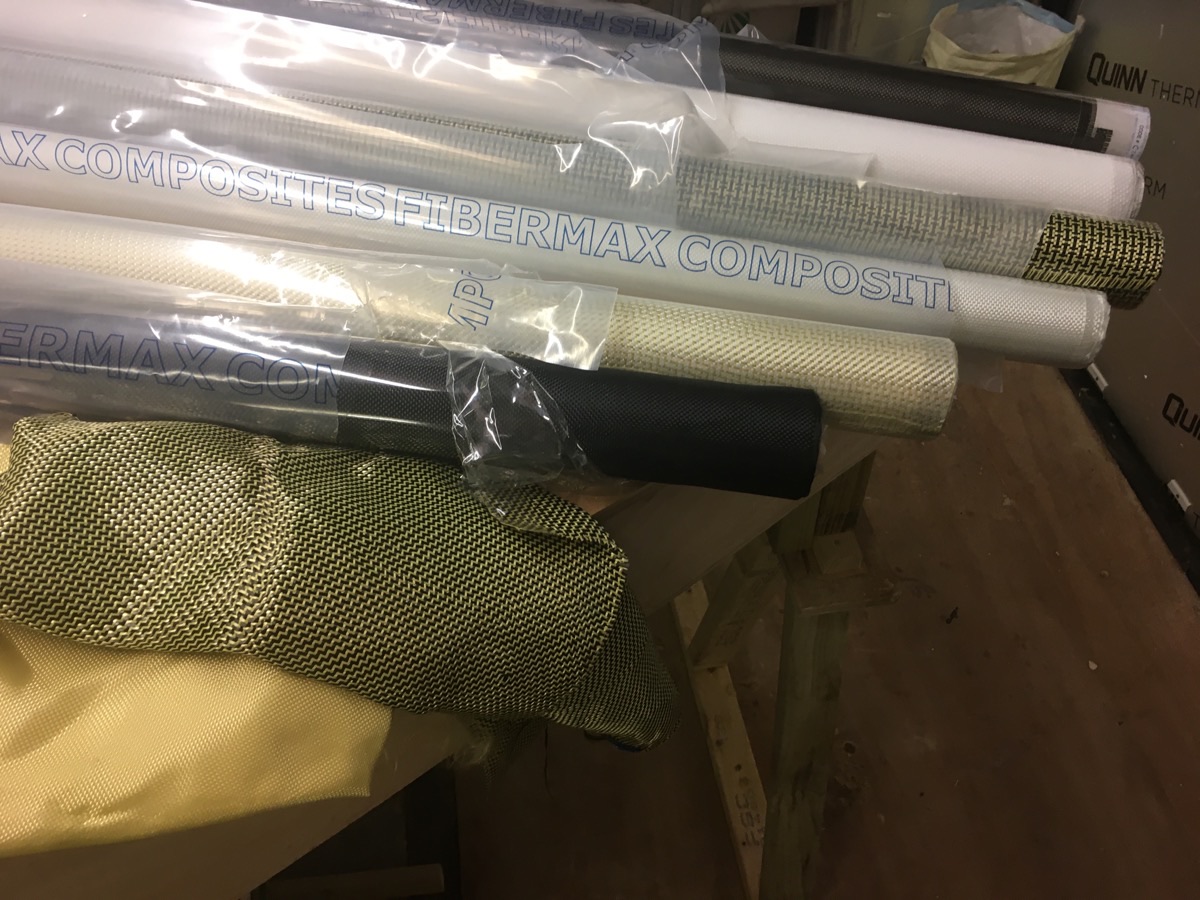
Turning my attention to a looming task of covering the outer hull with fabric laid up in epoxy once the planing surfaces are finished, there is a multitude of textile options out there that each have with their own advantages and disadvantages. It is also time we started thinking about the driver capsule, air intakes and engine covers. Assisting us with this is the very generous assistance of Damien Bensley of Colan Australia who manufacture high performance industrial textiles and who have come on board as a product sponsor along with Fibremax Ltd who specialise in composites. This month we received several samples of different fabrics including Kevlar and carbon fibre from Dimitrios Apostolakis at Fibremax and our composite design engineer Paul Martin also sent me fabric samples to see how we find working with them for different applications in relation to strength, impact, abrasion, etc and again I will let you know how we get on with these in future updates.
Well that concludes this update folks and once again I thank you for taking the time to pop by to catch up with our progress. If you have not already done so please ‘like’ our Facebook page to keep in touch with the venture. Hoping we all stay safe in these most challenging of times and please call in next month for a catch up on the exciting build of our jet hydroplane Longbow.